
Everything you need to know to demo the Ease experience.
Whether you’re talking to prospects or current groups, we understand it can be difficult to illustrate the employee experience in Ease — until now.
This 101 Lesson is designed to help you introduce Ease to your groups and prospects in an efficient and effective way.
In this lesson, we will cover:
- How to prepare to discuss and demo Ease
- Tips and tools to help you explain the employee and HR experience in Ease for all of your groups and prospects
STEP 2: Explain the Value
STEP 3: Prepare for the Demo
STEP 4: After the Demo
STEP 5: Successful Demo Complete!
Step 1: Familiarize yourself with Ease
Before you help your groups navigate Ease, we strongly recommend you complete your New Broker Training.
This training will cover the implementation of Ease for an employer group. You should be prepared with client information during the training so topics can be applied to the setup of an employer’s Ease portal. Reference our Ease Quickstart Guide for data that should be collected for a group prior to training.
Demo tip: If you want to use your New Broker Training to set up a demo account, you can come prepared with “mock” client information. This way you’ll have a demo account with test employees ready to go.
Additionally, our Help Desk has a training series designed for you that will take you through all the pertinent steps from setting up your portal to onboarding employees within a group. Whether you’re new to Ease or not, this is a good summary of what you will need to master yourself before demoing Ease to employer groups.
- Navigate your broker account
- Add Company / Add Plan
- Add/Import Employees
- Customize a company site
- Onboarding
- Employee experience
- Renewal/open enrollment
- Manage Changes
- Reports
Step 2: Explain the Value
Next, cover the value and benefits of using Ease for an entire company, from the company administrator to every single employee.
We recommend communicating the features that are included in a core subscription first. Following the demo, you can touch base on services they can add with an extra cost, like EaseHR or a specific payroll integration.
The following are the advantages of using Ease everyday that your groups will see right away.
Simplify Enrollment
| Company Administrators | Employees |
|---|---|
| • Simple setup. Ease is managed by your health insurance broker, who will complete setup for you and provide support every step of the way. • Manage qualifying events for employees needing to make mid-year changes. • No need to keep track of paper forms for benefits enrollment or onboarding, they can all be stored securely in the cloud. • Access to copies of enrollment forms or batches of all employee or all carrier forms. • Generate enrollment census reports. • Eliminate incomplete forms for online enrollment and onboarding with Ease’s rules-based system. • Generate a payroll deduction summary for all plans including pre-tax and post-tax per pay period deductions. |
• View a side-by-side comparison of plan options and prices when enrolling. • View benefits at home and review options and prices with dependents. • E-sign all required documents, from carrier forms to W-4 and I-9 forms. • Avoid entering the same information twice for benefits enrollment and onboarding. |
Increase Engagement
| Company Administrators | Employees |
|---|---|
| • Collect direct deposit information. • Create and send custom documents like a company handbook and offer letters. • Send applicants their benefit options with their offer letter. |
• Access to a benefits summary at all times via a free iOS mobile app. • Watch informational videos while making plan selections. • Ability to accept an offer and view the entire compensation package including salary and benefits at the same time. |
Gain Visibility
| Company Administrators | Employees |
|---|---|
| • Reconcile carrier invoices using on-demand summary reports. • Monitor enrollment progress and communicate with employees during their enrollment window. • Access to an ACA tracking tool, year-round. |
• Allow employees to access HR documents like employee handbooks or policy schedules any time in the cloud • Begin onboarding before the first day, with online W-4 and I-9 forms |
Use marketing tools to help
We also recommend using the following tools when talking your groups about Ease:
- Employer Overview PowerPoint Presentation
This slide deck includes slides about Ease’s core features as well as their benefits. You can expect to find information about online enrollment, benefits administration, hiring, onboarding and HR tools.
Feel free to customize this presentation with your branding and logo. You can even add slides about other topics you want to emphasize like voluntary benefits. - Online Enrollment and Onboarding Video
This 2 minute video is a perfect preview of the Ease’s core features for employers and employees. We recommend using this video to preview features that you will cover in your Ease demo.
Step 3: Prepare for the Demo
Okay, now that your groups have an understanding of how Ease can benefit their employees, it’s time to show them.
Pick your demo software
First, find software that you can use for a seamless demo. Any video conferencing software should work, as long as there is a screen sharing option. If you’re interested in recording demos to send to future groups or prospects, remember to look for that feature. Alternatively, you can bring your laptop or iPad to demo Ease during an in-person meeting.
Here are some options:
- Google Hangouts: This is a free option, as long as you have a gmail or Google Suite account. Please note you can only use Google Hangouts for up to 10 people.
- Zoom: This service offers free and paid options. For the free version, you can invite up to 100 people, but your call will be limited to 40 minutes. For $14.99 a month, you can invite up to 100 people with no time limit.
- Join.Me: For $30 a month, Join.Me offers space for video meetings of up to 250 people.
Set Up Your Demo Account
As we mentioned in step 1, the first thing you should do to prepare for a demo is set up a Demo Portal. We know there are several capabilities in Ease. But for a demo, we recommend you keep it very simple. You don’t want to overwhelm your prospects.
Here’s what we recommend:
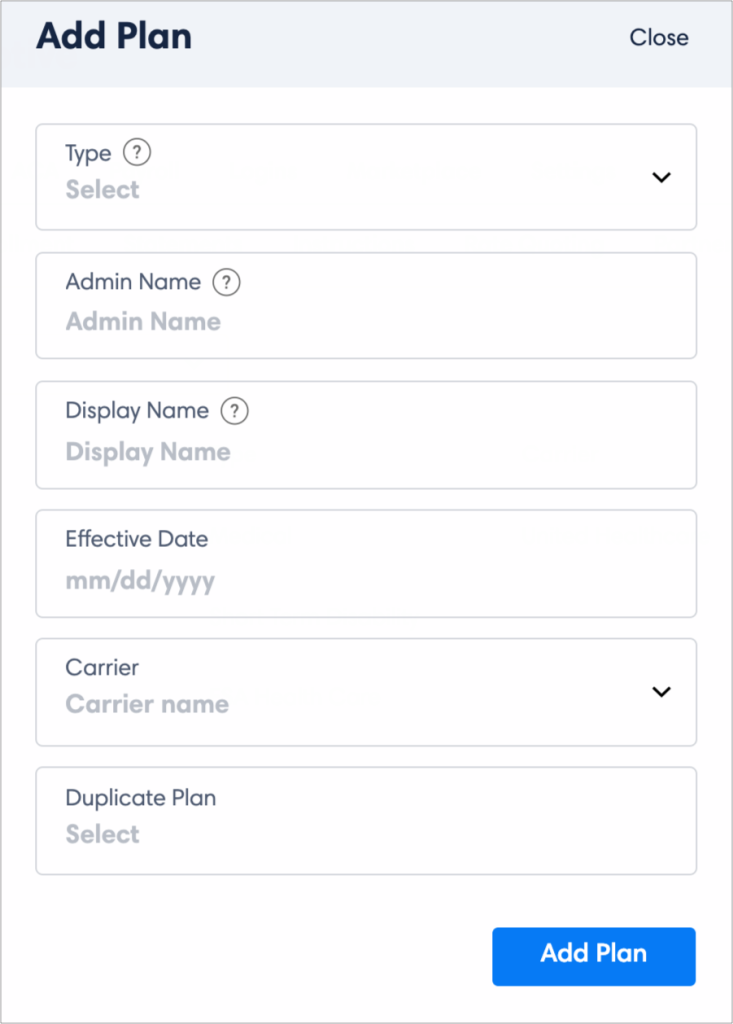
- Create one company that you can use in demos to both groups and prospects. Click “Add Company,” and enter “company name,” “city,” and “state.” You can then complete the test company’s profile.
Please note that there is no need to create a separate demo portal for all of your groups or prospects. If you ever want to show additional features like EaseHR, you can add those services to your demo portal down the road. - Remember to customize your demo account during setup. This is a great way to showcase that all companies can use their branding and logo on their own Ease portal. You can either use your own logo and a background image, or the generic options we have listed below. If you use your own images, we recommend a background image (usually a solid color) and a header image (usually a logo). For logos, a jpg or png file will work best.
- Once you’ve created a demo portal, you can add test employees for the test company you added above.
When adding a test employee for testing purposes, the Status in the Employees > Profile > Employment page should be designated as Test. Create 5-10 employees, make sure to mark one as a company admin in your test company.
This step is what will enable you to log in as both an employee and HR admin during a demo and show groups the employee and HR admin experiences. More on that below. - Add plans that most employers offer and what employees are used to. We suggest medical, dental, and life insurance plans.
- To make sure your demo account is properly functioning, log in as a test employee and verify the following displays accurately:
- Benefit eligibility
- Employee experience and instructions
- Employee contributions
- Completed forms
For more information, view our testing best practices page.
The information above is all covered in your training that we mentioned in part 1. If you need any guidance, use our Help Desk’s Quickstart Simple Setup Guide.
Okay, now it’s time for the actual demo!
For the best results, demo both the HR admin and employee experience, in whichever order you think is best (in this course we review the employee experience first). As we mentioned before, it’s important to reiterate the value propositions of the system, keep the demo simple, and cover the basics.
Employee Experience
To start, log in to Ease 15 minutes before your demo as one of your test employees (one that is not tagged as a company administrator), ready to begin benefits enrollment. This view will give groups the best look into the value Ease will bring to their employees.
Please note that if you have onboarding enabled, this step will precede the benefits enrollment. To show the benefits enrollment process first, complete the test employee’s onboarding before the demo.
The steps below outline the process all employees are required to follow for benefits enrollment, and what we think that you should show cover during your demo:
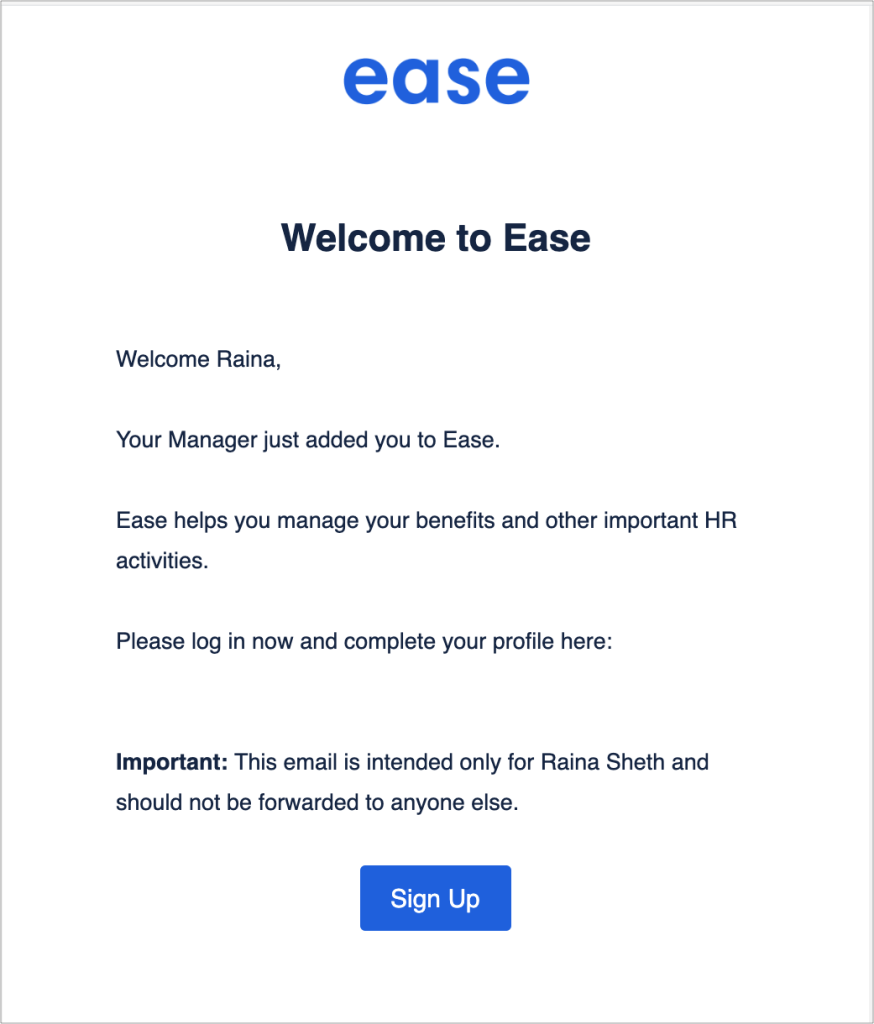
- An example of what “Welcome to Ease” email will look like in their inbox. Note that employees can do this from anywhere, including their mobile phone.
- The login page and how each employee will set up their username and password.
- The dashboard, and where they click to “Start Enrollment.”
- Profile: Explain that some fields will already be completed for employees, and others are blank. Each employee has the chance here to update and add contact information. Explain that an employee cannot go to the next step until all required information is completed.
- This is a great opportunity to communicate to the employer that they will be able to promptly and accurately collect all information they need for each employee.
- This is a great opportunity to communicate to the employer that they will be able to promptly and accurately collect all information they need for each employee.
- Dependents: How to add a dependent or edit dependent information.
- Medicare: How to add Medicare information if applicable.
- Benefits:
- Where an employee will see which benefits they are eligible for. As suggested above, we would review enrolling in a medical plan, dental plan, and life insurance plan:
- Display the drop down for enrolling or waiving coverage.
- Display where they can see the cost per pay period.
- Review the cost comparison and benefits summary (click on the Show comparison button.
- Once you (the test employee) have enrolled in all benefits, show the “total cost” per pay period for all benefits on the bottom right hand corner.
- Where an employee will see which benefits they are eligible for. As suggested above, we would review enrolling in a medical plan, dental plan, and life insurance plan:
- Beneficiaries: Review how an employee would add and edit beneficiary information. This is also a good opportunity to tell company administrators that employees can add as many beneficiaries as they want.
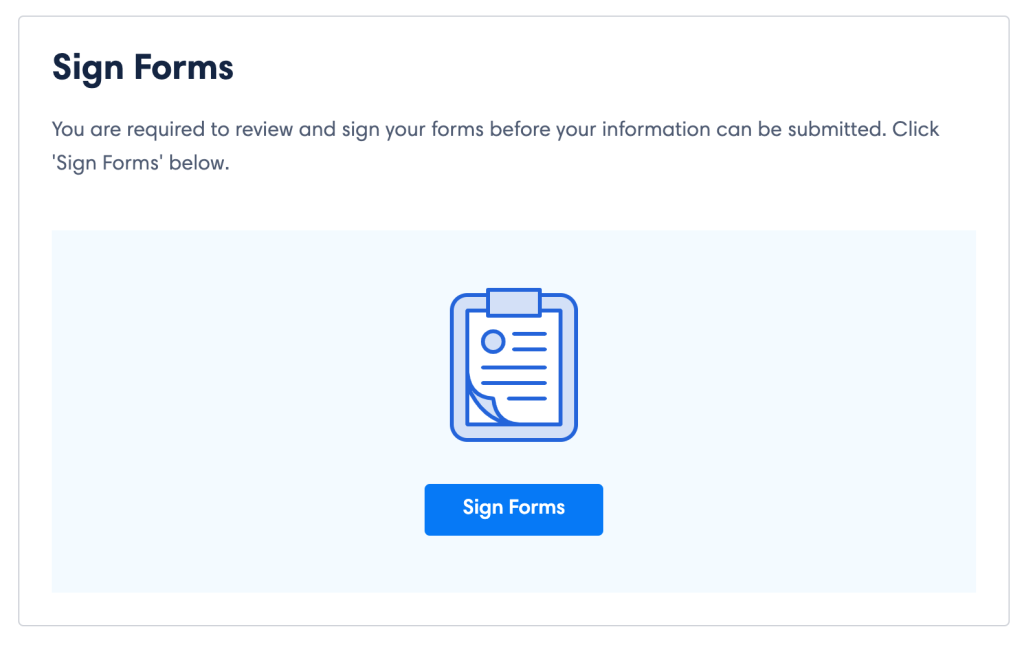
- Sign Forms: Next, employees will have to sign forms.
- This is a great time to illustrate Ease’s rules based system. For example, most medical plans require enrollees to review a supporting document. If this hasn’t been reviewed, the employee will be prohibited from signing forms.
- Show the “Missing Information” message, and then the process for going back and completing the missing information.
- Now, show the process for reviewing and e-signing forms.
- Summary: Review the test employee’s benefits summary, and explain that this is a page that employees have access to throughout the year, not just during enrollment.
HR Admin Experience
Now that you’ve covered the employee experience, it’s time to demo the HR admin experience. To start, login as the test employee that you marked as a company administrator.
-
- Enrollment Progress: Navigate to “Progress” and show your groups the dashboard available to HR admins in order to view the number of employees who have not started enrollment, are in progress of completing enrollment, and have completed enrollment. Then, demo how to generate an enrollment progress status report which identifies which specific employees are in the Not Started, In Progress, or Finished status.
- Message Employees Tool: This is a feature that’s included in the enrollment progress dashboard. Here, display how HR admins can create and send emails to employees in specific enrollment statuses through the system. If you want to write a sample email during a demo, you can use the language below. Hi employee, This is a reminder that you must complete open enrollment by [selected date]. Please contact me if you have any questions.
Sincerely,
Your HR Admin
- Reporting: HR admins are able to easily generate reports for enrollment forms, enrollment census reports, and consolidated billing. For the demo, generate one report as an example. All you have to do is click plans, and then reports, and pick which report you want to download.
And that’s it! Going through the ten steps outlined above will give your groups or prospects an accurate portrayal of the employee enrollment experience in Ease. If they want another demo, they can join Ease’s Weekly Employer Overview Webinar on Thursdays.
Before you complete the demo, ask your groups if they have any questions. If they ask about other Ease features, explain that you’ll be happy to show them these processes at a later time.
Bonus Information: An Onboarding Demo
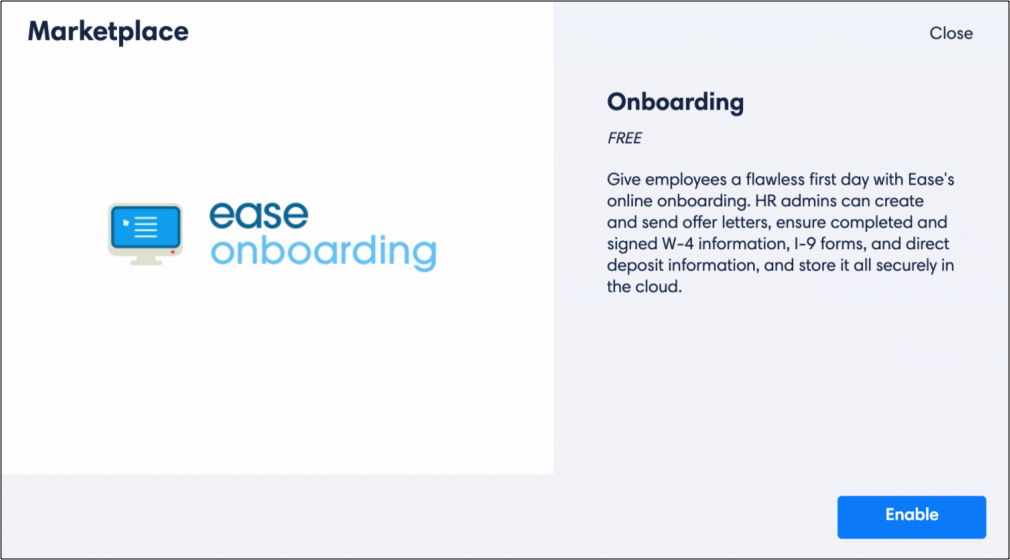
Onboarding with Ease is included with every broker subscription. If you do not have onboarding yet, it will be included when you renew your subscription. If you want to show this during your demo to groups, here’s a quick guide to doing so:
- Ensure that onboarding is enabled. You can do this in the Marketplace.
You will have the option to set different onboarding preferences. For your demos and groups in general, we suggest selecting the following preferences at the very minimum: I-9, W-4, Payroll, Emergency Contacts.
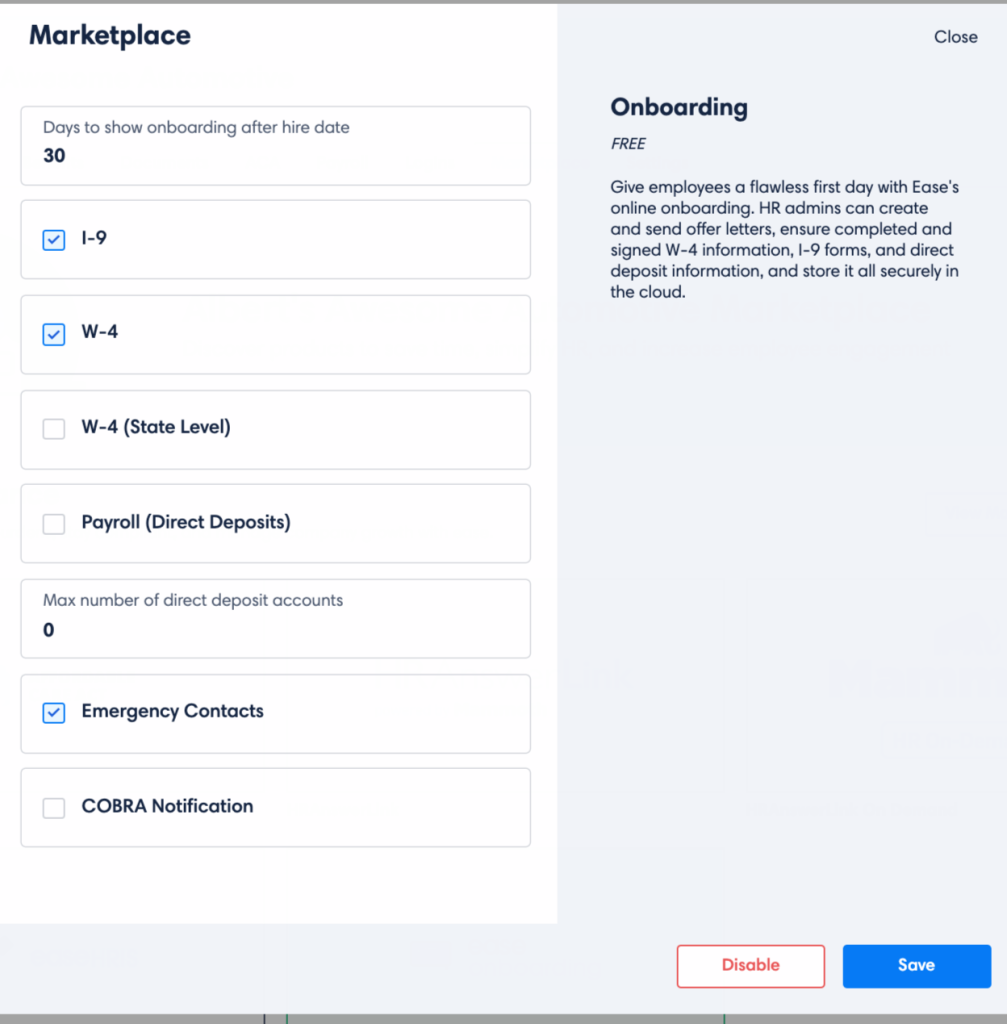
- Since an employee can only go through onboarding once, you will have to a create new test employee for each demo.
- Now, you can demo Onboarding from the employee experience:
- Log in to Ease as a new employee with your test employee login information (this login will be prompted by an email sent to the new employee).
- Click “Get Started” at the top of the page where you log in to the system in order to begin the onboarding process
- Completing emergency contacts. Have sample first names, last names, phone numbers, emails, and names prepared. Here is one you can use:
- John Smith
- 555-222-3333
- [email protected]
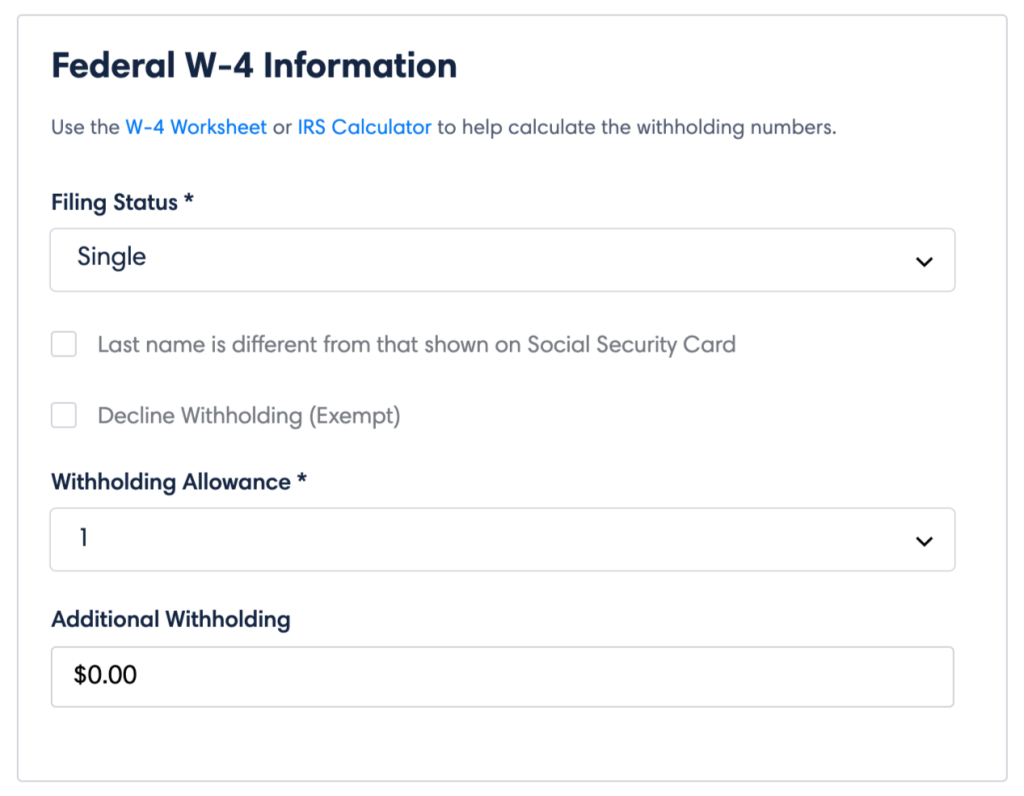
- W-4 Tax Information. Because the rules-based system will not allow an employee to skip this step, you will have to enter W-4 information, even if it is “fake.” To make it easier for you, we’ve included choices you can select to quickly move onto the next step:
- Filing Status: choose “Married”
- Last Name different: do not check
- Decline withholding: do not check
- Withholding allowance: choose “1”
- Additional withholding: leave at $0.00
- I-9 Documents: This section requires employees to upload documentation to confirm citizenship. For a demo, just save two files to your desktop, and title one “Driver’s License” and one “Birth Certificate” and show the process of uploading.
- Adding direct deposit information for payroll: To complete this step, you need information that matches the same character count of a valid bank account. We’ve rounded up “valid” sample information you can use:
- Bank Name: Chase
- Routing Number: 222222232
- Account Number: 3222222234
- Account Type: Checking
- Amount Type: Percentage (%)
- Account Percentage: 100%
- Ability to e-sign all documents. For this step, you just have to scroll down through all the onboarding documents you just demoed how to complete, and sign!
If you’d like, you can show the onboarding process first and then the benefits enrollment for an employee. This is the natural flow for the system if you add an employee to a company with onboarding enabled. This flow will illustrate how Ease syncs information across all its features so employees can avoid duplicate data entry.
For more information on Onboarding, check out Onboarding 101.
If you receive any questions during your demo that you don’t know how to answer, please contact [email protected].
Step 4: After the Demo
Now that you’ve shown your group or prospect the employer experience in Ease, it’s a great time to follow-up with other capabilities they will have with Ease. The following materials can teach them all about the complete Ease experience.
- Employer Fact Sheets. You can share these fact sheets for information about online enrollment, onboarding, and other Ease features:
- Beyond Online Enrollment Guide: We recommend sharing this guide with your groups once they are completely setup in Ease and have experienced a few enrollments. This guide is designed to educate employers on everything you and Ease can offer them, from payroll integration to time-off tracking.
If they want to hear about Ease communications themselves, feel free to email [email protected] and we can opt them into our employer communication emails and in-app messages.
Step 5: Successful Demo Complete!
There you have it! That’s your guide to demoing Ease to groups and prospects. As long as you know the product, share relevant information, and display the benefits experience, you’ll be good to go.


